
Notifications
MeshMonitor supports two notification methods: Web Push notifications for browsers/PWAs and Apprise for external notification services. Choose the method that works best for your needs, or use both!
4.0 — notifications are scoped
- Per-user, per-source Apprise URLs — set from Settings → Notifications; each user configures their own URLs for each source they subscribe to, so home-source alerts can go to your phone without spamming the warehouse-mesh Discord channel.
- Security Digest Apprise URL — a single admin-set URL in Settings → Security that fires the weak-key / duplicate-key digest, independent of any user's preferences.
Overview
MeshMonitor provides flexible notification options to ensure you never miss important messages:
Web Push Notifications
Browser-based notifications using the Web Push API with VAPID authentication. Works on iOS 16.4+ (Safari), Android (Chrome/Edge/Firefox), and desktop browsers - all without requiring any Apple certificates or platform-specific configuration.
Key Features:
- Cross-Platform: Works on iOS 16.4+, Android, and desktop browsers
- Zero Configuration: VAPID keys auto-generate on first run
- No Apple Certificates: Uses standard Web Push API
- Background Notifications: Receive alerts even when app is closed
- iOS-Compliant: Proper implementation prevents subscription cancellation
Apprise Notifications
External notification delivery via Apprise, supporting 100+ notification services including Discord, Slack, Telegram, Email, Microsoft Teams, and many more.
Key Features:
- 100+ Services: Discord, Slack, Telegram, Email, SMS, and more
- Bundled Integration: Apprise API included in MeshMonitor container
- Flexible Delivery: Use multiple notification services simultaneously
- Server-Side: Works without browser requirements
- Persistent Configuration: URLs stored in persistent volume
Browser Support
| Platform | Browser | Version | Status | Notes |
|---|---|---|---|---|
| iOS | Safari | 16.4+ | ✅ Supported | PWA install required |
| Android | Chrome | Latest | ✅ Supported | Works in browser or PWA |
| Android | Firefox | Latest | ✅ Supported | Works in browser or PWA |
| Android | Edge | Latest | ✅ Supported | Works in browser or PWA |
| Desktop | Chrome | Latest | ✅ Supported | |
| Desktop | Firefox | Latest | ✅ Supported | |
| Desktop | Edge | Latest | ✅ Supported | |
| Desktop | Safari | 16+ | ✅ Supported |
Server Requirements
HTTPS Requirement
Push notifications require HTTPS in most scenarios:
| Deployment | HTTPS Required? | Notes |
|---|---|---|
| Production (public) | ✅ Required | Must use valid SSL certificate |
| Production (internal) | ✅ Required | Self-signed certificates work for internal networks |
| Development (localhost) | ❌ Optional | Works on http://localhost or http://127.0.0.1 |
| iOS (any) | ✅ Required | iOS requires HTTPS for PWA and push notifications |
HTTPS is Critical for iOS
iOS requires HTTPS for push notifications, even on internal networks. Use a self-signed certificate or reverse proxy with SSL for testing on iOS devices.
SSL/TLS Certificate Options
1. Let's Encrypt (Recommended for Public Deployments)
Best for internet-facing deployments:
# Install Certbot
sudo apt install certbot python3-certbot-nginx

# Obtain certificate
sudo certbot --nginx -d meshmonitor.example.com

# Certificates auto-renewPros: Free, trusted by all browsers, automated renewal
Cons: Requires public DNS, 90-day validity
2. Self-Signed Certificates (Internal Networks)
For internal/testing deployments:
# Generate self-signed certificate
openssl req -x509 -newkey rsa:4096 -nodes \
  -keyout key.pem \
  -out cert.pem \
  -days 365 \
-subj "/CN=meshmonitor.local"Pros: Free, works for internal networks, no external dependencies
Cons: Browser warnings, must manually trust on each device
Trusting Self-Signed Certificates
- iOS: Settings → General → About → Certificate Trust Settings
- Android: Settings → Security → Install certificate
- Desktop: Browser will prompt to accept certificate
3. Reverse Proxy with SSL Termination (Recommended)
Use NGINX, Traefik, or Caddy to handle SSL:
server {
    listen 443 ssl http2;
    server_name meshmonitor.local;

    ssl_certificate /etc/ssl/certs/meshmonitor.crt;
    ssl_certificate_key /etc/ssl/private/meshmonitor.key;

    location / {
        proxy_pass http://meshmonitor:3001;
        proxy_set_header Host $host;
        proxy_set_header X-Real-IP $remote_addr;
        proxy_set_header X-Forwarded-For $proxy_add_x_forwarded_for;
        proxy_set_header X-Forwarded-Proto $scheme;
    }
}See the Reverse Proxy guide for complete setup.
VAPID Configuration
VAPID (Voluntary Application Server Identification) keys are used to authenticate push notification requests.
Automatic Configuration (Recommended)
MeshMonitor automatically generates and stores VAPID keys in the database on first run. No manual configuration needed!
Manual Configuration (Optional)
If you prefer to manage VAPID keys manually:
Generate keys:
bashnode generate-vapid-keys.jsAdd to
.envor docker-compose.yml:envVAPID_PUBLIC_KEY=your-public-key-here VAPID_PRIVATE_KEY=your-private-key-here VAPID_SUBJECT=mailto:admin@example.comRestart MeshMonitor
Environment Variables
The following environment variables are optional:
VAPID_PUBLIC_KEY- VAPID public key (auto-generated if not set)VAPID_PRIVATE_KEY- VAPID private key (auto-generated if not set)VAPID_SUBJECT- Contact email starting withmailto:(can be set via admin UI)
Docker Configuration
For Docker deployments, ensure you have HTTPS configured via reverse proxy:
services:
  meshmonitor:
    image: ghcr.io/yeraze/meshmonitor:latest
    container_name: meshmonitor
    environment:
      - MESHTASTIC_NODE_IP=192.168.1.100
      # VAPID keys auto-generate - no configuration needed!
    volumes:
      - meshmonitor-data:/data
    restart: unless-stopped

  nginx:
    image: nginx:alpine
    ports:
      - "443:443"
    volumes:
      - ./nginx.conf:/etc/nginx/nginx.conf:ro
      - ./certs:/etc/ssl/certs:ro
    depends_on:
- meshmonitorKubernetes Configuration
For Kubernetes, use cert-manager for automated certificate management:
apiVersion: cert-manager.io/v1
kind: Certificate
metadata:
  name: meshmonitor-tls
spec:
  secretName: meshmonitor-tls
  issuerRef:
    name: letsencrypt-prod
    kind: ClusterIssuer
  dnsNames:
- meshmonitor.example.comClient Setup
iOS Setup (Step-by-Step)
iOS requires the app to be installed as a PWA before notifications can work:
Step 1: Install MeshMonitor as PWA
- Open MeshMonitor in Safari (must be Safari, not Chrome or other browsers)
- Navigate to your MeshMonitor URL (must be HTTPS)
- Tap the Share button (square with arrow pointing up) at the bottom of the screen
- Scroll down and tap "Add to Home Screen"
- Tap "Add" in the top right corner
Only Safari Works for iOS PWA
PWA installation on iOS only works in Safari. Chrome, Firefox, and other browsers on iOS cannot install PWAs.
Step 2: Open from Home Screen
- Go to your home screen
- Tap the MeshMonitor icon (don't open Safari)
- The app should open in standalone mode (no Safari UI visible)
Verify Standalone Mode
You should NOT see the Safari address bar or navigation buttons. If you do, you're not in PWA mode and notifications won't work.
Step 3: Enable Notifications
- In MeshMonitor, navigate to Configuration → Notifications (in the sidebar)
- Verify all checkmarks are green under "Browser Support"
- Ensure "PWA Installed" shows ✅ Yes
- Click "🔔 Enable Notifications"
- When prompted, tap "Allow" to grant notification permission
- The app will automatically subscribe you to notifications
- You should see "✅ You are subscribed to push notifications!"
Step 4: Test Notifications (Optional)
- Have another user send a message on the mesh
- You should receive a notification even with the app closed
- Tap the notification to open MeshMonitor to that message
iOS Notification Permissions
If you deny permission, you must go to iOS Settings → MeshMonitor → Notifications to re-enable it. The app cannot re-request permission after denial.
Android Setup (Step-by-Step)
Android supports notifications both in the browser and as a PWA:
Option 1: Browser Notifications (Chrome/Edge/Firefox)
- Open MeshMonitor in your browser (HTTP or HTTPS both work for localhost)
- Navigate to Configuration → Notifications
- Click "🔔 Enable Notifications"
- When prompted, tap "Allow" to grant notification permission
- The app will automatically subscribe you
- You should see "✅ You are subscribed to push notifications!"
Option 2: PWA Installation (Recommended)
- Open MeshMonitor in Chrome/Edge
- Tap the ⋮ menu (three dots in top right)
- Tap "Install app" or "Add to Home screen"
- Tap "Install"
- Open the app from your home screen
- Follow the "Browser Notifications" steps above
PWA Benefits on Android
Installing as PWA provides:
- Standalone app experience
- Faster loading (offline support)
- Better notification reliability
- No browser address bar
Testing Notifications
- Have another user send a message
- Lock your screen or switch to another app
- You should receive a notification
- Tap notification to open MeshMonitor
Desktop Setup (Step-by-Step)
Desktop browsers support notifications without PWA installation:
Chrome/Edge/Brave
- Open MeshMonitor in your browser
- Navigate to Configuration → Notifications
- Click "🔔 Enable Notifications"
- When prompted, click "Allow" in the browser popup
- The app will automatically subscribe you
- You should see "✅ You are subscribed to push notifications!"
Firefox
- Open MeshMonitor in Firefox
- Navigate to Configuration → Notifications
- Click "🔔 Enable Notifications"
- Click "Allow" in the Firefox permission popup
- The app will automatically subscribe you
- You should see "✅ You are subscribed to push notifications!"
Safari (macOS)
- Open MeshMonitor in Safari 16+
- Navigate to Configuration → Notifications
- Click "🔔 Enable Notifications"
- Click "Allow" when Safari prompts for permission
- You'll be automatically subscribed
Desktop Notifications
Desktop notifications work even when the browser is minimized or in the background. The browser does NOT need to be in focus.
Administrator Configuration
Updating VAPID Contact Email
The VAPID subject (contact email) is sent with each push notification request:
- Go to Configuration → Notifications (admin only)
- Scroll to "VAPID Configuration"
- Update the "Contact Email" field (must start with
mailto:) - Click "Update Contact Email"
Example: mailto:admin@example.com
Viewing Subscription Status
Admins can see:
- VAPID Status: Whether keys are configured
- Active Subscriptions: Number of users subscribed to notifications
- Public Key: First 50 characters of the VAPID public key
Testing Notifications
Admins can send test notifications:
- Go to Configuration → Notifications
- Scroll to "Test Notifications" section
- Click "🧪 Send Test Notification"
- All subscribed users (including yourself) will receive a test notification
Test Sends to ALL Users
The test notification is sent to ALL subscribed users, not just the admin. Use sparingly!
Apprise Notifications Setup
Apprise allows you to send notifications to 100+ external services including Discord, Slack, Telegram, Email, and more.
What is Apprise?
Apprise is a universal notification library that supports a vast array of notification services through a simple URL-based configuration. MeshMonitor bundles Apprise directly in the Docker container for easy setup.
Supported Services
Apprise supports 100+ notification services including:
- Chat & Messaging: Discord, Slack, Microsoft Teams, Telegram, Matrix, Rocket.Chat
- Email: SMTP, Gmail, SendGrid, Mailgun, Amazon SES
- SMS: Twilio, MessageBird, Nexmo, Clickatell
- Push Notifications: Pushover, Pushbullet, Pushsafer, Notify
- Social Media: Twitter/X
- Development Tools: GitHub, GitLab, JIRA
- Home Automation: Home Assistant, MQTT
- And many more...
See the full list of supported services in the Apprise documentation.
Enabling Apprise
- Navigate to Configuration → Notifications in MeshMonitor
- In the Notification Services section at the top, toggle "Apprise Notifications" to enabled (green border)
- Click "Save Notification Settings"
- The Apprise Configuration section will appear below
Configuring Notification URLs
Apprise uses URL-based configuration. Each service has a unique URL format:
Discord Example
discord://webhook_id/webhook_tokenTo get your Discord webhook URL:
- In Discord, go to Server Settings → Integrations → Webhooks
- Create a new webhook or edit an existing one
- Copy the webhook URL (e.g.,
https://discord.com/api/webhooks/123456789/abcdefg...) - Convert to Apprise format:
discord://123456789/abcdefg...
Slack Example
slack://token_a/token_b/token_cEmail Example
mailto://user:password@gmail.comFor Gmail, you'll need to use an App Password:
mailto://your-email@gmail.com:app-password@gmail.comTelegram Example
tgram://bot_token/chat_idMicrosoft Teams Example
msteams://token_a/token_b/token_cAdding Multiple Services
You can configure multiple notification services simultaneously. Simply add one URL per line in the Apprise Configuration textarea:
discord://webhook_id/webhook_token
slack://token_a/token_b/token_c
mailto://user:password@gmail.com
tgram://bot_token/chat_idAll configured services will receive notifications for new messages.
Testing Apprise Notifications
After configuring your URLs:
- Click "Save Configuration" to save your Apprise URLs
- Click "Test Connection" to verify the configuration works
- You should receive test notifications on all configured services
- Send a test message in MeshMonitor to verify real notifications work
URL Format Reference
Each service has a specific URL format. Here are some common examples:
| Service | URL Format | Notes |
|---|---|---|
| Discord | discord://webhook_id/webhook_token | Get from Server Settings → Webhooks |
| Slack | slack://token_a/token_b/token_c | From Slack app configuration |
| Email (SMTP) | mailto://user:pass@smtp.example.com | Standard SMTP configuration |
| Gmail | mailto://user:app-password@gmail.com | Requires App Password |
| Telegram | tgram://bot_token/chat_id | Get from BotFather |
| Pushover | pover://user_key@token | From Pushover account |
| Microsoft Teams | msteams://token_a/token_b/token_c | From Teams webhook |
For complete URL format documentation for all services, see the Apprise Wiki.
Persistent Configuration
Apprise URLs are stored in /data/apprise-config/urls.txt inside the Docker container, which is mapped to the persistent /data volume. This means your Apprise configuration will survive:
- Container restarts
- Container upgrades
- System reboots
Security Considerations
Protect Your Notification URLs
Apprise URLs contain authentication tokens that allow sending notifications to your services. Keep these URLs secure:
- Don't commit them to version control
- Restrict access to the Notifications configuration page (admin only)
- Rotate tokens if compromised
- Use read-only or limited-permission tokens when possible
Troubleshooting Apprise
URLs Not Saving
- Check that you clicked "Save Configuration" after entering URLs
- Verify the
/datavolume is writable - Check Docker logs for errors:
docker logs meshmonitor
Notifications Not Receiving
- Verify Apprise is enabled in Notification Services section
- Click "Test Connection" to verify URLs are correct
- Check Docker logs for error messages:bash
docker logs meshmonitor | grep -i apprise - Verify the URL format matches the service requirements
- Check that tokens/credentials are still valid
Connection Test Fails
- Verify the URL format is correct for your service
- Check that authentication tokens are valid and not expired
- Ensure the container has network access to the notification service
- For Discord/Slack, verify the webhook still exists
Muting Channels and DMs
You can silence notifications for a specific channel or direct message conversation without disabling notifications globally. Mutes are stored on the server and apply across all your devices and browsers.
Muting a Channel
- Open the Channels tab
- Click the 🔔 icon next to the channel name in the channel header
- Select a mute duration from the dropdown:
- Mute indefinitely — stays muted until you unmute it
- Mute for 1 hour — automatically expires after 60 minutes
- Mute for 1 week — automatically expires after 7 days
- The channel icon changes to 🔇 in both the header and the sidebar
Muting a DM Conversation
- Open a direct message thread
- Click the Actions ▼ menu at the top of the conversation
- Select a mute option (indefinitely, 1 hour, or 1 week)
- The DM entry in the sidebar shows a 🔇 indicator while muted
Unmuting
- Channel: Click the 🔇 icon in the channel header and select Unmute
- DM: Open the Actions ▼ menu and select Unmute
What Muting Affects
Muting a channel or DM suppresses:
- Browser audio notification sounds
- Web Push notifications sent to your browser/device
- Apprise notifications (Discord, Slack, email, etc.) delivered by the server
Whitelist Overrides Mutes
If a message contains a keyword on your notification whitelist, it will still trigger a notification even if the channel is muted. Use the whitelist for high-priority terms (like your call sign) that should always break through.
Mute Expiry
Time-based mutes expire automatically — no server-side job runs. Expiry is checked at the moment each notification is evaluated, so a mute that expires while you are away is correctly lifted the next time a message arrives.
Cross-Device Sync
Mute preferences are stored in your user account on the MeshMonitor server (in user_notification_preferences). They apply regardless of which browser or device you use to access MeshMonitor.
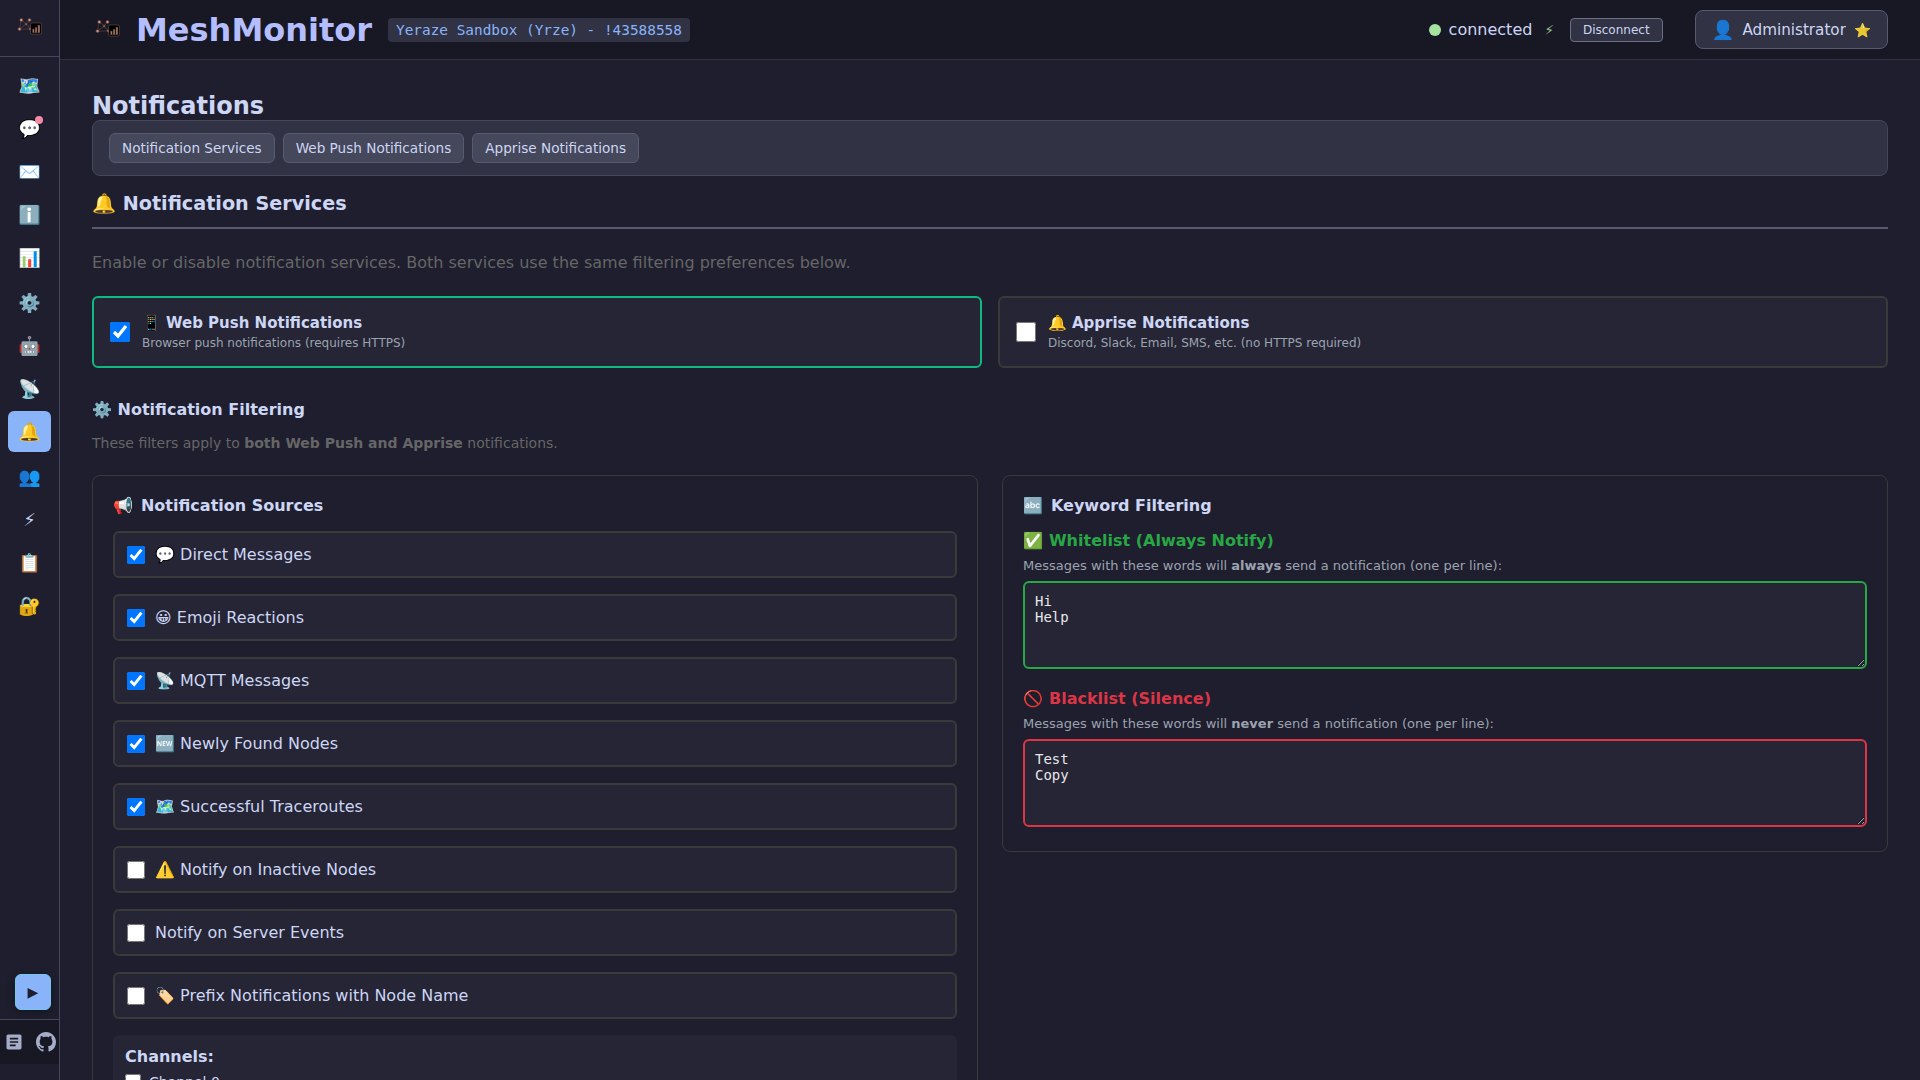
Notification Settings
Notification Services
Users can enable or disable notification services independently:
- Web Push Notifications: Browser/PWA-based notifications
- Apprise Notifications: External notification services (Discord, Slack, etc.)
Both services can be enabled simultaneously, and they share the same filtering preferences.
Filtering Preferences
Notification filtering applies to both Web Push and Apprise notifications:
- Whitelist: Keywords that always trigger notifications (highest priority)
- Blacklist: Keywords that never trigger notifications (second priority)
- Emoji Reactions: Enable/disable notifications for emoji-only messages (third priority)
- Newly Found Nodes: Enable/disable notifications when new nodes are discovered
- Successful Traceroutes: Enable/disable notifications for completed traceroute responses
- Enabled Channels: Specific channels to receive notifications from
- Direct Messages: Enable/disable direct message notifications
The filtering follows this priority order for message notifications:
- Whitelist → Always send notification if keyword matches
- Blacklist → Never send notification if keyword matches
- Emoji Reactions → Filter emoji-only messages if disabled
- Channel/DM Settings → Send only if channel is enabled or DM is enabled
Special Event Notifications (bypass message filtering):
- Newly Found Nodes → Sent when a new node appears on the mesh (includes node name and hop count)
- Successful Traceroutes → Sent when a traceroute completes (includes full forward and return route)
Emoji Reaction Filtering
When "Emoji Reactions" is disabled, notifications will be suppressed for messages containing only emojis (e.g., "👍", "😀", "❤️"). Messages with emojis mixed with text will still trigger notifications normally. This is useful for reducing notification noise from emoji reactions and tapbacks.
Special Event Notifications
New Node and Traceroute notifications bypass normal message filtering (whitelist/blacklist/channel settings) and are only sent if you have that specific preference enabled. These notifications help you stay informed about mesh network topology changes and connectivity testing without cluttering your message notifications.
MeshCore Sources
MeshCore sources have their own Notifications tab, and the settings are tailored to what MeshCore actually supports. Because MeshCore and Meshtastic expose different capabilities, the notification options shown for a MeshCore source are a subset:
| Notification | MeshCore | Notes |
|---|---|---|
| Low Battery | ✅ | MeshCore reports battery as a voltage (mV), so the threshold is in millivolts (default 3300 mV) rather than a 0–100 percentage. |
| Inactive Node | ✅ | Alerts when a monitored MeshCore node hasn't been heard within the configured window. |
| Newly Found Nodes | ✅ | Sent the first time a contact advertises (display name + device type: Companion / Repeater / Room Server). |
| Server Events | ✅ | Source connect/disconnect/reconnect. |
| Web Push / Apprise / Monitored-node picker | ✅ | Delivery and node selection work the same as Meshtastic. |
| Direct Messages, Emoji Reactions, MQTT, Traceroutes, Channel selection, Keyword filtering, percentage battery threshold | ❌ | Hidden for MeshCore — these depend on Meshtastic-only protocol features or data. |
All preferences are scoped per-source, so a MeshCore source and a Meshtastic source can have independent thresholds and monitored-node lists.
Client-Side Settings (Web Push Only)
For Web Push notifications specifically:
- Enable/Disable: Grant or revoke browser permission
- Subscribe/Unsubscribe: Opt-in or opt-out of receiving notifications
- Per-Device: Each device (phone, tablet, desktop) requires separate subscription
Browser Permissions
Notification permissions are controlled by the browser. If denied, you must reset permissions in browser settings:
- Chrome: Click lock icon → Site settings → Notifications
- Safari: Safari → Settings → Websites → Notifications
- Firefox: Click lock icon → Permissions → Notifications
Server-Side Settings
Web Push:
- No configuration required - VAPID keys auto-generate on first run
- Optional: Update VAPID Contact Email via admin UI
- Optional: Set manual VAPID keys via environment variables
Apprise:
- Bundled Apprise API runs automatically in Docker container
- Configuration stored in persistent
/data/apprise-config/directory - No environment variables required
Troubleshooting
Notifications Not Working
Check Browser Support
- Go to Configuration → Notifications
- Verify all checkmarks under "Browser Support" are green:
- ✅ Notifications API: Supported
- ✅ Service Workers: Supported
- ✅ Push API: Supported
- ✅ Permission: Granted
- ✅ Subscription: Subscribed
iOS-Specific Issues
Problem: "PWA Installed" shows ⚠️ No
Solution:
- Ensure you opened MeshMonitor in Safari (not Chrome)
- Add to Home Screen via Safari's Share button
- Open from the home screen icon (not Safari)
Problem: Notifications not appearing
Solution:
- Go to iOS Settings → MeshMonitor → Notifications
- Ensure "Allow Notifications" is ON
- Check notification settings (Lock Screen, Banner, etc.)
Problem: "Subscription Cancelled" message
Solution:
- This shouldn't happen with MeshMonitor's iOS-compliant implementation
- If it does, unsubscribe and re-subscribe in app
- Check browser console for errors
Android-Specific Issues
Problem: Permission denied
Solution:
- Go to Android Settings → Apps → [Browser] → Notifications
- Enable notifications for the browser
- Return to MeshMonitor and try again
Problem: Not receiving notifications
Solution:
- Ensure browser is allowed to run in background
- Disable battery optimization for browser:
- Settings → Battery → Battery optimization
- Find browser, set to "Don't optimize"
Desktop-Specific Issues
Problem: Permission denied
Solution:
- Chrome:
chrome://settings/content/notifications - Firefox: Options → Privacy & Security → Permissions → Notifications
- Safari: Safari → Settings → Websites → Notifications
- Find MeshMonitor URL and set to "Allow"
Problem: Notifications not appearing when browser is closed
Solution:
- Most desktop browsers require the browser to be running (can be minimized)
- On Windows/Linux, check system notification settings
- On macOS, check System Settings → Notifications
HTTPS/SSL Issues
Problem: "PWA cannot be installed" on iOS
Solution:
- iOS requires HTTPS for PWA installation
- Use valid SSL certificate or self-signed certificate
- Trust the certificate in iOS settings if self-signed
Problem: Mixed content warnings
Solution:
- Ensure ALL resources load over HTTPS
- Check browser console for specific HTTP resource URLs
- Update any hard-coded HTTP URLs to HTTPS
VAPID Configuration Issues
Problem: "VAPID public key not available"
Solution:
- Check server logs for VAPID key generation errors
- Ensure database is writable
- Restart MeshMonitor to trigger auto-generation
- Alternatively, manually set VAPID keys via environment variables
Problem: Push notifications fail to send
Solution:
- Check server logs for push notification errors
- Verify VAPID keys are configured correctly
- Ensure subscription endpoint is valid
- Check network connectivity from server to push service
How It Works
Architecture Overview
┌─────────────┐          ┌──────────────┐          ┌─────────────┐
│   Browser   │          │  MeshMonitor │          │ Push Service│
│             │          │    Server    │          │ (Browser)   │
└─────────────┘          └──────────────┘          └─────────────┘
       │                         │                         │
       │  1. Request Permission  │                         │
       │────────────────────────>│                         │
       │                         │                         │
       │  2. Subscribe with VAPID│                         │
       │────────────────────────>│                         │
       │                         │                         │
       │  3. Store Subscription  │                         │
       │                         │──┐                      │
       │                         │  │ Database             │
       │                         │<─┘                      │
       │                         │                         │
       │                         │  4. New Message Arrives │
       │                         │──┐                      │
       │                         │<─┘                      │
       │                         │                         │
       │                         │  5. Send Push           │
       │                         │────────────────────────>│
       │                         │                         │
       │  6. Receive Notification│                         │
       │<──────────────────────────────────────────────────│
       │                         │                         │
       │  7. Click Notification  │                         │
       │─────────────────────────────────────────>        │
│ (Opens/Focuses App) │Subscription Flow
- User clicks "Enable Notifications"
- Browser requests permission from user
- User grants permission
- Frontend subscribes with PushManager using VAPID public key
- Browser generates subscription (endpoint + keys)
- Frontend sends subscription to backend API
- Backend stores subscription in database
- User receives push notifications for new messages
Notification Flow
- New message arrives on Meshtastic node
- Backend processes and stores message
- Backend sends push via Web Push API to browser's push service
- Push service routes to user's browser
- Service Worker receives push event (even if app closed)
- Service Worker shows notification to user
- User sees notification on lock screen/notification center
iOS-Specific Handling
iOS Safari has strict requirements to prevent abuse:
- event.waitUntil(): Must be used to keep service worker alive
- Silent push detection: Sending 3+ silent pushes cancels subscription
- PWA requirement: Only works when installed to home screen
- User interaction: Permission must be requested via user action
MeshMonitor handles all of these requirements automatically with iOS-compliant service worker implementation.
Security & Privacy
VAPID Authentication
- All push requests are authenticated with VAPID keys
- Push services verify the request came from your server
- Prevents unauthorized parties from sending notifications
User Control
- Users must explicitly grant permission
- Users must explicitly subscribe
- Users can unsubscribe at any time
- Each device requires separate subscription
Endpoint Security
- Subscription endpoints are unique per user/device
- Endpoints are stored securely in database
- Expired subscriptions are automatically cleaned up
Privacy
- Push payload only contains message preview (not full message)
- No personal data stored in push subscription
- User can revoke permission at any time in browser settings
API Reference
Subscribe to Push Notifications
POST /api/push/subscribe
Content-Type: application/json

{
  "subscription": {
    "endpoint": "https://push.service.com/...",
    "keys": {
      "p256dh": "base64-encoded-key",
      "auth": "base64-encoded-key"
    }
  }
}Unsubscribe from Push Notifications
POST /api/push/unsubscribe
Content-Type: application/json

{
  "endpoint": "https://push.service.com/..."
}Get VAPID Public Key
GET /api/push/vapid-key

Response:
{
  "publicKey": "BFz...",
  "status": {
    "configured": true,
    "subscriptionCount": 5
  }
}Send Test Notification (Admin Only)
POST /api/push/test
Content-Type: application/json

{}

Response:
{
  "sent": 5,
  "failed": 0
}Update VAPID Subject (Admin Only)
PUT /api/push/vapid-subject
Content-Type: application/json

{
  "subject": "mailto:admin@example.com"
}Get VAPID Status (Admin Only)
GET /api/push/status

Response:
{
  "status": {
    "configured": true,
    "publicKey": "BFz...",
    "subject": "mailto:admin@example.com",
    "subscriptionCount": 5
  }
}Related Documentation
- Reverse Proxy Configuration - Set up HTTPS with NGINX/Traefik/Caddy
- HTTP vs HTTPS - Understanding SSL/TLS certificates
- Production Deployment - Best practices for production
- Settings - Configure MeshMonitor behavior