
Device Configuration
The Configuration tab in MeshMonitor allows you to remotely configure your connected Meshtastic device. Changes are sent directly to the device and typically require a reboot to take effect.
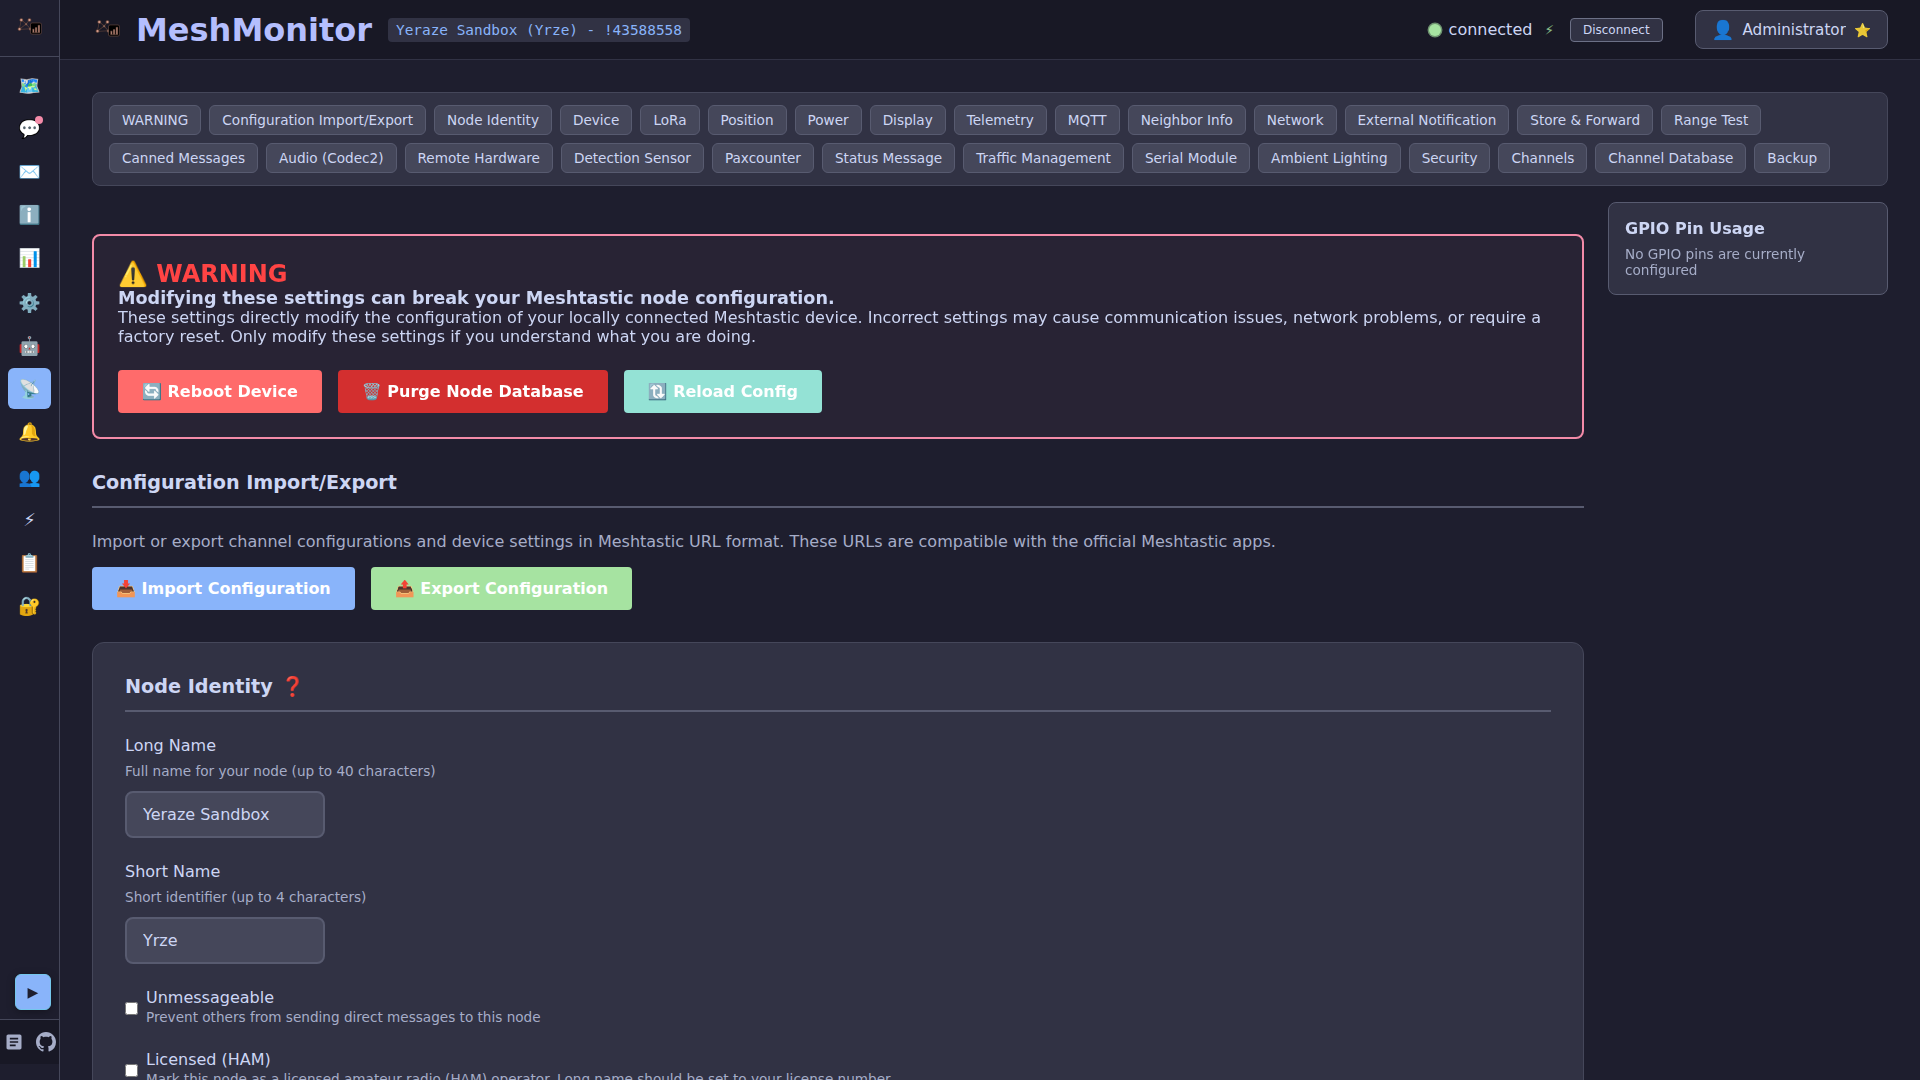
WARNING
Configuration changes directly modify your Meshtastic device settings. Always ensure you understand the impact of changes before applying them, as incorrect settings may affect device functionality or network connectivity.
Node Identity
Long Name
Description: The full display name for your node, shown in node lists and messages.
Maximum Length: 39 characters
Effect: Changes how your node appears to other users on the mesh network.
Side Effects:
- Broadcasts the new name to all mesh users
- May take several minutes to propagate throughout the network
- Requires device reboot to take effect
Best Practices:
- Use descriptive names that help identify location or purpose
- Avoid special characters that may not display correctly
- Keep it concise for better display on small screens
Short Name
Description: A 4-character abbreviated name for your node.
Maximum Length: 4 characters
Effect: Used in compact displays and when bandwidth is limited.
Side Effects:
- Broadcasts the new short name to all mesh users
- Some interfaces use short name exclusively
- Requires device reboot to take effect
Best Practices:
- Use easily recognizable abbreviations
- Typically derived from long name (e.g., "Base Station 1" → "BS01")
- Avoid ambiguous abbreviations
Related Meshtastic Documentation
Device Configuration
Device Role
Defines how your node behaves on the mesh network and affects power consumption, relay behavior, and visibility.
CLIENT (Default)
Description: General-purpose mode for devices with app connections or standalone messaging.
Behavior:
- Rebroadcasts packets when no other node has done so
- Normal power consumption
- Full mesh network participation
Use Cases:
- Personal handheld devices
- Desktop monitoring stations
- General mesh participation
Side Effects: Standard airtime usage and power consumption
CLIENT_MUTE
Description: Device that participates but does not forward packets from other devices.
Behavior:
- Receives and sends own messages
- Does NOT relay packets for others
- Reduced network load contribution
Use Cases:
- Reducing network congestion
- Low-power deployments
- Personal use without helping the mesh
Side Effects: Reduces overall mesh connectivity; not recommended for community networks
ROUTER ⚠️
Description: Infrastructure node that always rebroadcasts packets to extend network coverage.
Behavior:
- Always relays all packets (no intelligent delay)
- Visible in network topology
- Significantly increased power consumption
Use Cases:
- Fixed infrastructure installations
- Strategic coverage extension points
- Powered installations only
Side Effects:
- Very high airtime usage
- Significant battery drain (not suitable for battery power)
- May cause network congestion if overused
DANGER
MeshMonitor will warn you before setting ROUTER mode. Only use this for powered, fixed infrastructure nodes in strategic locations.
TRACKER
Description: Optimized for broadcasting GPS position with priority handling.
Behavior:
- GPS packets are prioritized
- Reduced relay activity
- Optimized for frequent position updates
Use Cases:
- Vehicle tracking
- Asset tracking
- Mobile position reporting
Side Effects: Position broadcasts consume airtime; best for moving assets
SENSOR
Description: Optimized for broadcasting telemetry data with priority handling.
Behavior:
- Telemetry packets are prioritized
- Reduced relay activity
- Efficient power usage for sensors
Use Cases:
- Environmental monitoring stations
- Weather sensors
- Remote sensor deployments
Side Effects: Telemetry broadcasts consume airtime
TAK
Description: Optimized for ATAK (Android Team Awareness Kit) system communication.
Behavior:
- Reduces routine broadcasts
- Optimized for tactical communications
- Requires Meshtastic ATAK Plugin
Use Cases:
- Integration with ATAK systems
- Tactical operations
- Coordinated activities
Side Effects: Requires ATAK plugin for full functionality
CLIENT_HIDDEN
Description: Minimalist broadcasting for stealth or extreme power savings.
Behavior:
- Only broadcasts when absolutely necessary
- Minimal network presence
- Maximum power conservation
Use Cases:
- Stealth deployments
- Ultra-low-power requirements
- Hidden installations
Side Effects: Reduced network visibility; may appear offline to other users
LOST_AND_FOUND
Description: Broadcasts location messages to assist with device recovery.
Behavior:
- Regular location broadcasts to default channel
- Optimized for device recovery
- Increased GPS activity
Use Cases:
- Lost or stolen device recovery
- Temporary deployment tracking
Side Effects: Frequent position broadcasts; high power usage
TAK_TRACKER
Description: Standalone Position Location Information (PLI) for ATAK systems.
Behavior:
- Automatic TAK PLI broadcasts
- Reduced routine broadcasts
- Optimized for tactical tracking
Use Cases:
- Tactical position tracking with ATAK
- Team location awareness
- Coordinated operations
Side Effects: Requires ATAK integration
ROUTER_LATE
Description: Infrastructure node that rebroadcasts only after all other modes attempt relay.
Behavior:
- Waits for other nodes to relay first
- Provides backup coverage
- Visible in network topology
Use Cases:
- Covering dead spots in local clusters
- Backup coverage for specific areas
- Ensuring local reliability without overloading broader mesh
Side Effects: Increased airtime usage (but less than ROUTER); best for powered installations
CLIENT_BASE
Description: Personal base station that prioritizes favorited nodes.
Behavior:
- Always rebroadcasts packets from/to favorited nodes
- Handles other packets like CLIENT
- Helps extend range for specific nodes
Use Cases:
- Strong attic/roof installations
- Distribution node for weaker indoor devices
- Personal network enhancement
Side Effects: Increased relay activity for favorited nodes
Node Info Broadcast Interval
Description: How often the device broadcasts its node information to the mesh.
Range: 3600-4294967295 seconds (1 hour - ~136 years)
Default: 10800 seconds (3 hours)
Minimum: 3600 seconds (1 hour)
Effect: Controls how frequently other nodes receive updated information about your device (name, position, battery status, etc.).
Side Effects:
- Shorter intervals: More network traffic, more up-to-date information, higher power usage
- Longer intervals: Less network traffic, potentially stale information, lower power usage
- Affects how quickly name changes and position updates propagate
Best Practices:
- Use default (3 hours) for most deployments
- Increase for static installations (6-12 hours)
- Decrease only for highly mobile nodes needing frequent updates
Related Meshtastic Documentation
LoRa Radio Configuration
Use Preset
Description: Enable or disable using predefined modem configurations.
Recommendation: Keep enabled unless you have specific requirements for custom settings.
Effect: When enabled, modem parameters (bandwidth, spreading factor, coding rate) are set automatically based on the selected preset.
Side Effects: Disabling requires manual configuration of advanced LoRa parameters
Advanced Configuration
When "Use Preset" is disabled, you must manually configure bandwidth, spreading factor, and coding rate. Incorrect settings can prevent communication with other nodes or violate regulatory requirements. Only disable presets if you have specific technical requirements and understand LoRa modulation parameters.
Manual LoRa Parameters
These parameters are only available when "Use Preset" is disabled. They provide fine-grained control over radio modulation for advanced users.
Bandwidth
Description: Channel bandwidth in kHz, which determines the frequency range used for transmission.
Range: 31-500 kHz
Common Values:
- 31 (31.25 kHz) - Narrowest, best interference resistance
- 125 kHz - Good balance
- 250 kHz - Most common, used by all standard presets
- 500 kHz - Widest, highest data rate
Effect: Wider bandwidth = faster data rate but more susceptible to interference. Narrower bandwidth = slower data rate but better sensitivity and interference resistance.
Side Effects:
- All nodes must use the same bandwidth to communicate
- Wider bandwidths may violate duty cycle regulations in some regions
- Affects battery life (wider = more power)
Best Practices:
- Use 250 kHz for most deployments (matches all standard presets)
- Only change if you have specific range or speed requirements
- Verify regulatory compliance for your region
Spreading Factor
Description: Number of chirps per symbol, which determines how the signal is spread across time.
Range: 7-12
Effect: Higher spreading factor = longer range but slower data rate. Each increment doubles range but halves speed.
Common Configurations:
- SF7: Shortest range, fastest speed (5.47 kbps @ 125kHz)
- SF9: Medium range (SHORT presets)
- SF10: Good range (MEDIUM presets)
- SF11: Long range (LONG presets)
- SF12: Maximum range, slowest speed (293 bps @ 125kHz)
Side Effects:
- Higher SF = longer airtime = more battery usage
- Higher SF = more susceptible to frequency drift
- All nodes must use the same SF to communicate
- Different SFs are orthogonal (can coexist without interference)
Best Practices:
- Start with SF11 (LONG_FAST default) for most deployments
- Increase to SF12 only for extreme range requirements
- Lower to SF7-9 for dense local networks
Coding Rate
Description: Denominator of the forward error correction (FEC) coding rate.
Range: 5-8
Format: Coding rate is 4/N where N is the value you set (5-8)
Common Values:
- 5 (4/5): Lightest error correction, fastest speed
- 6 (4/6): Light error correction
- 7 (4/7): Moderate error correction
- 8 (4/8): Heaviest error correction, most robust
Effect: Higher coding rate (larger denominator) = more error correction overhead but better resistance to interference.
Side Effects:
- Higher coding rate = longer airtime = more battery usage
- Higher coding rate = slower effective data rate
- All nodes must use the same coding rate to communicate
Best Practices:
- Use 8 (4/8) for long-range or noisy environments (LONG_FAST default)
- Use 5 (4/5) for clean, short-range links (SHORT_FAST)
- Most presets use 8 for maximum reliability
Frequency Offset
Description: Fine-tuning frequency offset in MHz for crystal calibration and drift compensation.
Range: Typically ±0.5 MHz
Default: 0
Effect: Adjusts the transmission frequency by a small amount to compensate for crystal oscillator inaccuracies.
Use Cases:
- Compensating for temperature drift
- Correcting known crystal frequency errors
- Fine-tuning for optimal performance with specific hardware
Side Effects:
- Incorrect offset can prevent communication
- Should only be changed if you've measured a frequency error
- Most devices do not require adjustment
Best Practices:
- Leave at 0 unless you have a specific reason to change it
- Only adjust if you've used test equipment to measure frequency error
- Very rarely needed with modern hardware
Modem Preset
Predefined radio settings that balance range, speed, and reliability. All nodes on a mesh must use compatible settings to communicate.
LONG_FAST (Default)
- Range: Maximum
- Speed: Fast
- Bandwidth: 250kHz
- Spreading Factor: 11
- Coding Rate: 4/8
- Best For: Most deployments, good balance
LONG_SLOW
- Range: Maximum
- Speed: Slowest
- Bandwidth: 250kHz
- Spreading Factor: 12
- Coding Rate: 4/8
- Best For: Extreme range, low traffic networks
LONG_MODERATE
- Range: Maximum
- Speed: Moderately Fast
- Bandwidth: 250kHz
- Spreading Factor: 11
- Coding Rate: 4/6
- Best For: Good range with better throughput than LONG_SLOW
MEDIUM_SLOW
- Range: Medium
- Speed: Slow
- Bandwidth: 250kHz
- Spreading Factor: 11
- Coding Rate: 4/8
- Best For: Moderate range deployments
MEDIUM_FAST
- Range: Medium
- Speed: Fast
- Bandwidth: 250kHz
- Spreading Factor: 10
- Coding Rate: 4/7
- Best For: Urban deployments with moderate coverage needs
SHORT_SLOW
- Range: Short
- Speed: Slow
- Bandwidth: 250kHz
- Spreading Factor: 9
- Coding Rate: 4/8
- Best For: Dense local networks
SHORT_FAST
- Range: Short
- Speed: Fast
- Bandwidth: 250kHz
- Spreading Factor: 7
- Coding Rate: 4/5
- Best For: High-density local networks, fastest messaging
SHORT_TURBO
- Range: Very Short
- Speed: Fastest
- Bandwidth: 500kHz (widest)
- Spreading Factor: 7
- Coding Rate: 4/5
- Best For: Close-range, high-speed applications
Side Effects:
- All mesh participants must use compatible settings
- Changing presets may disconnect you from the network
- Slower presets = longer airtime = more power usage
- Faster presets = shorter range
Region
Description: Sets the frequency band and regulatory settings for your location.
Important: Select the correct region for your location to comply with local regulations.
Options:
- UNSET: Region not configured
- US: United States (915MHz)
- EU_433: European Union (433MHz)
- EU_868: European Union (868MHz)
- CN: China
- JP: Japan
- ANZ: Australia/New Zealand (915MHz)
- KR: Korea
- TW: Taiwan
- RU: Russia
- IN: India
- NZ_865: New Zealand (865MHz)
- TH: Thailand
- LORA_24: WLAN Band (2.4GHz)
- UA_433: Ukraine (433MHz)
- UA_868: Ukraine (868MHz)
- MY_433: Malaysia (433MHz)
- MY_919: Malaysia (919MHz
- SG_923: Singapore
- PH_433: Philippines (433MHz)
- PH_868: Philippines (868MHz)
- PH_915: Philippines (915MHz)
- ANZ_433: Australia / New Zealand (433MHz)
- KZ_433: Kazakhstan (433MHz)
- KZ_863: Kazakhstan (863MHz)
- NP_865: Nepal (865MHz)
- BR_902: Brazil (902MHz)
Side Effects:
- Incorrect region may violate local regulations
- May prevent communication with local mesh networks
- Affects maximum power output and duty cycle limits
Legal Compliance
Always select the correct region for your location. Using incorrect frequency bands may be illegal and could result in fines or equipment confiscation.
Hop Limit
Description: Maximum number of times a message can be relayed through the mesh.
Range: 0-7
Default: 3
Effect: Limits how far messages can propagate through the network. Each relay counts as one hop.
Side Effects:
- Lower values (0-2): Reduced network range, less congestion, lower power usage
- Higher values (5-7): Extended range, increased network load, more battery drain across all nodes
- Value of 7 allows messages to traverse large networks but may cause congestion
Best Practices:
- Use default (3) for most deployments
- Increase (4-5) only for very large geographic coverage
- Decrease (1-2) for dense local networks to reduce congestion
Channel Number
Description: LoRa channel number used for frequency hopping within the selected frequency band.
Range: 0-255
Default: 0
Effect: Determines the specific frequency offset within your region's frequency band. All nodes on the same mesh network must use the same channel number to communicate.
Side Effects:
- Changing channel number will disconnect you from nodes using different channel numbers
- Can be used to create isolated networks within the same physical area
- Does not affect regulatory region compliance (region setting controls legal frequencies)
Best Practices:
- Use default (0) unless you need network isolation
- Change only if you need to avoid interference with another nearby mesh network
- Ensure all nodes in your network use the same channel number
RX Boosted Gain (SX126x)
Description: Enable boosted receive gain mode for devices using SX126x radio chips (e.g., RAK4631, LilyGo T-Beam with SX1262).
Default: Disabled
Effect: Improves receiver sensitivity, allowing the radio to receive weaker signals and potentially extending range.
Side Effects:
- Increased power consumption: Boosted gain mode uses more power, reducing battery life
- May increase noise: Higher sensitivity can also pick up more background RF noise
- Only works on SX126x radios: Has no effect on SX127x or other radio types
Best Practices:
- Enable for fixed, powered installations where power consumption isn't a concern
- Consider enabling for routers or infrastructure nodes to improve network coverage
- Disable for battery-powered mobile nodes to maximize battery life
- Test range improvement in your specific environment (results vary)
Hardware Compatibility:
- ✅ Works: Devices with SX1262, SX1268 radios (RAK4631, some T-Beam models, Heltec V3)
- ❌ No effect: Devices with SX1276, SX1278 radios (older T-Beam, some Heltec models)
Related Meshtastic Documentation
Position Configuration
Position Broadcast Interval
Description: How often to broadcast GPS position updates.
Range: 1-4294967295 seconds
Default: 900 seconds (15 minutes)
Effect: Controls frequency of position broadcasts to the mesh network.
Side Effects:
- Shorter intervals: More network traffic, more current position data, higher power/battery usage
- Longer intervals: Less network traffic, potentially stale position data, lower power usage
Best Practices:
- Mobile nodes: 300-900 seconds (5-15 minutes)
- Fixed nodes: 3600+ seconds (1+ hours)
- Disable entirely (very large value) for nodes that don't need position sharing
Smart Position
Description: Intelligently adjusts position broadcast frequency based on movement.
Effect: When enabled, broadcasts more frequently when moving, less frequently when stationary.
Side Effects:
- Reduces unnecessary broadcasts for stationary nodes
- May delay position updates slightly
- Saves battery on mobile deployments
Best Practices: Enable for mobile nodes, optional for fixed installations
Fixed Position
Description: Override GPS with a manually specified location.
Effect: Device reports the configured coordinates instead of GPS data.
Use Cases:
- Nodes without GPS hardware
- Indoor installations where GPS doesn't work
- Correcting inaccurate GPS readings
- Privacy (hiding exact GPS location)
Configuration: When enabled, enter:
- Latitude: Decimal degrees (-90 to 90)
- Longitude: Decimal degrees (-180 to 180)
- Altitude: Meters above sea level
Side Effects:
- Position never updates even if device moves
- GPS hardware is not used (saves power)
Related Meshtastic Documentation
Power Configuration
Configure power management and battery settings for your Meshtastic device. These settings control sleep behavior, shutdown thresholds, and power consumption optimization.
Power Saving Mode
Description: Enable power saving features to extend battery life.
Effect: When enabled, the device uses various power-saving techniques to reduce power consumption.
Side Effects:
- Reduced responsiveness when waking from sleep
- Longer wake-up time for messages
- Extended battery life
Best Practices: Enable for battery-powered deployments
Shutdown After (Battery)
Description: Automatically shut down the device after the specified time on battery power.
Range: 0-4294967295 seconds (0 = disabled)
Effect: Prevents complete battery drain by shutting down before battery is depleted.
Use Cases:
- Protecting LiPo batteries from over-discharge
- Scheduled operation windows
- Emergency beacon deployments
Side Effects: Device will power off and require manual restart
ADC Multiplier Override
Description: Calibration value for battery voltage reading accuracy.
Default: Auto-calculated by firmware
Effect: Adjusts the analog-to-digital converter scaling for accurate battery percentage reporting.
Use Cases:
- Correcting inaccurate battery readings
- Custom battery configurations
- Hardware with non-standard voltage dividers
Best Practices: Only change if battery percentage readings are consistently inaccurate
Wait Bluetooth Seconds
Description: How long to wait for Bluetooth connection before entering sleep mode.
Range: 0-4294967295 seconds
Effect: Controls the Bluetooth connection window before power-saving sleep.
Side Effects: Longer values delay sleep but give more time for Bluetooth connections
SDS (Deep Sleep) Seconds
Description: Duration of super deep sleep periods when no activity is detected.
Range: 0-4294967295 seconds
Effect: Controls how long the device stays in deepest sleep mode.
Best Practices: Use longer periods for solar/battery nodes to maximize power savings
LS (Light Sleep) Seconds
Description: Duration of light sleep periods between active wake cycles.
Range: 0-4294967295 seconds
Effect: Controls light sleep duration (faster wake-up than deep sleep).
Best Practices: Balance between power savings and responsiveness
Minimum Wake Seconds
Description: Minimum time the device stays awake after waking from sleep.
Range: 0-4294967295 seconds
Effect: Ensures device is active long enough to process messages before returning to sleep.
Side Effects: Higher values increase power consumption but improve message handling reliability
Battery INA Address
Description: I2C address for INA battery monitoring chip.
Default: Auto-detected
Effect: Specifies the I2C address when using external INA battery monitoring hardware.
Use Cases: Custom hardware with non-standard I2C addresses
Related Meshtastic Documentation
Display Configuration
Configure screen and display settings for Meshtastic devices with integrated screens or external displays.
Screen On Seconds
Description: How long the screen stays on after activity.
Range: 0-4294967295 seconds
Default: 60 seconds
Effect: Controls screen timeout to save power.
Best Practices: Lower values for battery-powered devices, higher for powered stations
Auto Screen Carousel Seconds
Description: Time between automatic screen rotations through different display pages.
Range: 0-4294967295 seconds (0 = disabled)
Effect: Automatically cycles through status screens (node info, telemetry, messages, etc.).
Use Cases:
- Unattended display monitoring
- Dashboard/kiosk mode
- Showing all available information automatically
Flip Screen
Description: Rotate display 180 degrees.
Effect: Inverts the screen orientation for upside-down mounting.
Use Cases: Mounting device in enclosures with inverted display orientation
Measurement Units
Description: Unit system for measurements (metric/imperial).
Options:
- METRIC: Distances in km/m, temperatures in Celsius
- IMPERIAL: Distances in mi/ft, temperatures in Fahrenheit
Effect: Changes how distance, speed, altitude, and temperature are displayed.
OLED Type
Description: Type of OLED display connected to the device.
Options:
- AUTO: Automatically detect display type
- SSD1306: Standard 128x64 OLED (most common)
- SH1106: 132x64 OLED (similar to SSD1306 with offset)
- SH1107: Larger 128x128 OLED
- SH1107_128_128: 128x128 variant
Effect: Configures driver for correct display rendering.
Best Practices: Use AUTO unless you have display issues, then select your specific model
Display Mode
Description: Color and rendering mode for the display.
Options:
- DEFAULT: Standard single-color rendering
- TWOCOLOR: Optimized for displays with two-color sections (e.g., yellow header, blue body)
- INVERTED: Inverted colors (white background, dark text)
- COLOR: Full color mode for color displays
Effect: Adjusts rendering for different display types and preferences.
Heading Bold
Description: Render heading/title text in bold.
Effect: Makes headers more prominent on the display.
Wake on Tap or Motion
Description: Wake the screen when device detects tap or motion.
Effect: Uses accelerometer (if present) to wake display.
Side Effects: May cause unwanted wake-ups from vibration; increases power consumption slightly
Compass Orientation
Description: Rotation offset for the compass heading display.
Options: 0, 90, 180, 270 degrees
Effect: Adjusts compass heading to match physical device orientation.
Use Cases: When device is mounted at an angle from its default orientation
Related Meshtastic Documentation
Telemetry Configuration
Configure telemetry data collection and broadcasting for environmental sensors, device metrics, and power monitoring.
Device Telemetry
Device Update Interval
Description: How often to broadcast device metrics (battery, voltage, uptime, etc.).
Range: 0-4294967295 seconds
Default: 1800 seconds (30 minutes)
Effect: Controls frequency of device health broadcasts.
Side Effects:
- Shorter intervals: More current data, higher network traffic
- Longer intervals: Less traffic, potentially stale readings
Environment Telemetry
Configure environmental sensor (temperature, humidity, pressure, etc.) reporting.
Environment Measurement Enabled
Description: Enable collection of environmental sensor data.
Effect: Activates any connected environmental sensors (BME280, BMP280, DHT22, etc.).
Side Effects: Increases power consumption when sensors are actively reading
Environment Update Interval
Description: How often to broadcast environmental sensor data.
Range: 0-4294967295 seconds
Default: 1800 seconds (30 minutes)
Effect: Controls frequency of environment data broadcasts.
Environment Screen Enabled
Description: Show environmental data on the device screen.
Effect: Adds a screen page displaying temperature, humidity, and pressure readings.
Display Fahrenheit
Description: Show temperature in Fahrenheit instead of Celsius.
Effect: Changes temperature display format on device screen.
Note: Does not affect the transmitted data (always sent in Celsius internally)
Air Quality Monitoring
Configure air quality sensor (particulate matter) reporting.
Air Quality Enabled
Description: Enable air quality sensor data collection.
Effect: Activates connected air quality sensors (PM2.5, PM10, etc.).
Air Quality Interval
Description: How often to broadcast air quality data.
Range: 0-4294967295 seconds
Effect: Controls frequency of air quality data broadcasts.
Power Metrics
Configure power monitoring for nodes with power metering hardware.
Power Measurement Enabled
Description: Enable power consumption/generation monitoring.
Effect: Activates power monitoring sensors (INA219, INA226, etc.).
Use Cases:
- Solar power monitoring
- Battery charge/discharge tracking
- Power consumption analysis
Power Update Interval
Description: How often to broadcast power metrics.
Range: 0-4294967295 seconds
Effect: Controls frequency of power data broadcasts.
Power Screen Enabled
Description: Show power metrics on the device screen.
Effect: Adds a screen page displaying power consumption/generation data.
Related Meshtastic Documentation
Network Configuration
Configure network settings including WiFi, NTP, and static IP addresses.
WiFi Configuration
WiFi Enabled
Description: Enable WiFi connectivity on the device.
Effect: Activates the WiFi radio for network connectivity.
Side Effects:
- Increased power consumption
- Enables web interface access
- Required for MQTT over WiFi
WiFi SSID
Description: Network name to connect to.
Maximum Length: 32 characters
Effect: Specifies the wireless network for connection.
WiFi Password
Description: Password for the WiFi network.
Security: Stored on device; included in configuration backups
NTP Configuration
NTP Server
Description: Network Time Protocol server address for time synchronization.
Default: pool.ntp.org
Effect: Configures where the device gets accurate time when connected to the internet.
Use Cases:
- Accurate timestamps on messages
- Synchronized logging
- Time-sensitive applications
Static IP Configuration
Address Mode
Options:
- DHCP: Obtain IP address automatically from the network
- STATIC: Use manually configured IP address
Effect: Controls how the device obtains its network address.
IPv4 Address
Description: Static IP address for the device (when using STATIC mode).
Format: 192.168.1.100 (dotted decimal)
IPv4 Gateway
Description: Network gateway address (router IP).
Format: 192.168.1.1 (dotted decimal)
IPv4 Subnet
Description: Network subnet mask.
Format: 255.255.255.0 (dotted decimal)
Common Values: 255.255.255.0 for /24 networks
IPv4 DNS
Description: DNS server address for name resolution.
Format: 8.8.8.8 (dotted decimal)
Common Options: 8.8.8.8 (Google), 1.1.1.1 (Cloudflare)
Related Meshtastic Documentation
MQTT Configuration
Enable MQTT
Description: Connect your Meshtastic device to an MQTT broker for internet connectivity.
Effect: Allows messages to bridge between your local mesh and other mesh networks via the internet.
Use Cases:
- Connecting multiple mesh networks
- Internet gateway functionality
- Remote monitoring and control
- Integration with home automation systems
MQTT Address
Description: Hostname or IP address of the MQTT broker.
Format: hostname:port or ip:port
Example: mqtt.example.com:1883
MQTT Username & Password
Description: Credentials for authenticating with the MQTT broker.
Effect: Required if your MQTT broker uses authentication.
Security: Credentials are stored on the device
MQTT Encryption
Description: Enable TLS/SSL encryption for MQTT connections.
Recommendation: Always enable for public/internet MQTT brokers.
Effect: Encrypts MQTT traffic between device and broker.
Side Effects: Slightly higher power usage due to encryption overhead
MQTT JSON
Description: Enable JSON encoding for MQTT messages.
Effect: Messages are sent in JSON format instead of protobuf.
Use Cases:
- Integration with systems that expect JSON
- Easier debugging and monitoring
- Home automation systems
Side Effects: Larger message size compared to protobuf
TLS Enabled
Description: Enable TLS/SSL encryption for the MQTT connection.
Recommendation: Always enable for public/internet MQTT brokers.
Effect: Encrypts all MQTT traffic between the device and broker.
Side Effects: Slightly higher power usage due to encryption overhead.
MQTT Root Topic
Description: Base topic for MQTT messages.
Default: msh/
Effect: Customizes the MQTT topic hierarchy.
Use Cases: Running multiple independent mesh networks on same MQTT broker
Proxy to Client (Client Proxy Mode)
Description: Route MQTT traffic through a connected client application instead of directly from the node's WiFi.
Effect: Instead of the node connecting directly to the MQTT broker, it sends MQTT packets to a connected client (mobile app, MeshMonitor, etc.) which then forwards them to the broker.
Use Cases:
- Nodes with unreliable WiFi (T-Deck, portable devices)
- Serial or BLE-connected nodes that don't have WiFi
- Centralized MQTT management through your server
- More reliable connectivity via Docker containers with health checks
MeshMonitor Integration
When using MeshMonitor, enable this option and deploy the MQTT Client Proxy sidecar. The proxy container handles all MQTT forwarding automatically.
Credit: MQTT Proxy by LN4CY
How It Works:
- Node sends
mqttClientProxyMessageto connected client - Client (MQTT Proxy) publishes message to MQTT broker
- Client receives messages from broker and forwards to node
- Same protocol used by official Meshtastic mobile apps
Map Reporting
Description: Enable periodic location reporting to the MQTT map service.
Effect: Your node's position will be published to the configured MQTT broker for map display.
Use Cases: Integration with meshmap.net or custom mapping solutions.
Map Publish Interval
Description: How often to publish location updates to the map.
Default: 0 (use system default)
Range: 0-4294967295 seconds
Map Position Precision
Description: Position precision for map reporting.
Range: 10-19 (higher = more precise)
Privacy Note: Lower precision values share less exact location data.
Related Meshtastic Documentation
Neighbor Info
Enable Neighbor Info Module
Description: Automatically collect and broadcast information about neighboring nodes.
Effect: Shares data about directly connected nodes (0-hop neighbors) with the network.
Use Cases:
- Network topology analysis
- Understanding node connectivity
- Optimizing node placement
Neighbor Info Interval
Description: How often to send neighbor information updates.
Range: 1-4294967295 seconds
Default: 14400 seconds (4 hours)
Effect: Controls frequency of neighbor information broadcasts.
Side Effects:
- Shorter intervals: More network traffic, more current data
- Longer intervals: Less network traffic, potentially stale data
Related Meshtastic Documentation
Canned Message Configuration
Configure pre-defined messages that can be quickly sent using hardware buttons or a rotary encoder on your Meshtastic device.
Enable Canned Messages
Description: Enable the canned message module.
Effect: Activates the canned message selection interface on devices with buttons or encoders.
Use Cases:
- Quick responses without typing
- Emergency messages
- Status updates while mobile
Rotary Encoder
Description: Enable rotary encoder input for message selection.
Effect: Allows using a rotary dial to scroll through canned messages.
Hardware: Requires rotary encoder connected to GPIO pins
Up/Down Buttons
Description: Enable up/down button input for message selection.
Effect: Allows using physical buttons to navigate canned messages.
Send Bell
Description: Send bell character with messages.
Effect: Causes receiving devices to play an alert sound.
Use Cases: Emergency messages, urgent alerts
Allow Input Source
Description: Which input source is allowed to trigger canned messages.
Options: NONE, UP, DOWN, LEFT, RIGHT, SELECT, BACK, CANCEL
Effect: Restricts which hardware inputs can activate canned message sending.
Advanced GPIO Settings
These settings configure the physical GPIO pin connections for rotary encoders and buttons.
Pin A / Pin B
Description: GPIO pins for rotary encoder A and B signals.
Range: 0-255
Effect: Specifies which GPIO pins are connected to the rotary encoder.
Note: Consult your device's pinout diagram for available GPIO pins
Pin Press
Description: GPIO pin for the encoder press/select button.
Range: 0-255
Effect: Specifies which GPIO pin is connected to the button.
Event Mappings
Configure which navigation events are triggered by encoder rotation and button press:
- Event CW: Action triggered by clockwise rotation
- Event CCW: Action triggered by counter-clockwise rotation
- Event Press: Action triggered by button press
Options: NONE, UP, DOWN, LEFT, RIGHT, SELECT, BACK, CANCEL
Related Meshtastic Documentation
Store and Forward Configuration
Configure the store-and-forward module to cache and replay messages for nodes that were offline.
Enable Store and Forward
Description: Enable the store-and-forward module.
Effect: Device will cache messages and replay them to nodes that request missed messages.
Use Cases:
- Ensuring message delivery to intermittently connected nodes
- Mesh networks with mobile nodes
- Areas with unreliable coverage
Is Server
Description: Configure this node as a store-and-forward server.
Effect: When enabled, this node actively stores messages and serves them to requesting clients.
Best Practices:
- Enable on powered, always-on nodes with good mesh coverage
- Only one or two servers needed per mesh network
- Choose nodes with stable power and central location
Side Effects: Increases memory usage and power consumption
Heartbeat
Description: Send periodic heartbeat messages to indicate server availability.
Effect: Broadcasts server presence so clients know a store-and-forward server is available.
Side Effects: Adds periodic network traffic
Records
Description: Maximum number of messages to store.
Range: 0-65535
Effect: Limits how many messages are kept in the cache.
Best Practices:
- Set based on available memory
- Higher values for longer offline periods
- Consider message size and available RAM
History Return Max
Description: Maximum number of messages to return in a single history request.
Range: 0-255
Effect: Limits how many messages are sent at once when a client requests history.
Best Practices: Balance between completeness and network congestion
History Return Window
Description: Maximum age of messages to return (in seconds).
Range: 0-86400 seconds (up to 24 hours)
Effect: Only returns messages newer than this time window.
Best Practices:
- Set based on typical offline duration
- Longer windows for nodes that go offline for extended periods
- Shorter windows reduce stale message replay
Related Meshtastic Documentation
Applying Changes
All configuration changes require clicking the "Save" button in each section. Most changes also require a device reboot to take effect. MeshMonitor will notify you when a reboot is required.
Troubleshooting
Configuration Not Saving
- Ensure you have a stable connection to the Meshtastic device
- Check that the device is powered and responsive
- Verify you have appropriate permissions
Device Disconnected After Changes
- Some configuration changes (especially LoRa settings) may temporarily disconnect the device
- Wait 30-60 seconds for the device to reboot and reconnect
- If device doesn't reconnect, verify the configuration is compatible with your mesh network
Can't Communicate After Region Change
- Ensure region matches other nodes in your mesh
- Verify the frequency is legal in your location
- Check that modem preset is compatible
Device Configuration Backup
MeshMonitor provides comprehensive backup functionality that exports your complete device configuration in a format fully compatible with the official Meshtastic CLI --export-config command.
What Gets Backed Up
The backup export includes your complete device configuration:
- Device Settings: Node identity, role, timezone, broadcast intervals
- LoRa Radio: Modem preset, region, bandwidth, spreading factor, coding rate, hop limit, TX power
- Position: GPS settings, broadcast intervals, smart position, fixed position coordinates
- Power: Battery management, sleep settings, shutdown behavior
- Network: WiFi credentials, Bluetooth settings
- Security: Device keys (encrypted)
- MQTT: Broker settings, encryption, topics, credentials
- Module Configuration: All enabled modules (telemetry, neighbor info, canned messages, detection sensor, etc.)
- Channel Configuration: All channels with encryption keys (encoded in channel URL)
Backup Features
Automated Backups
MeshMonitor can automatically create backups on a daily schedule:
- Navigate to Settings → Backup
- Enable Automated Backups
- Set your preferred backup time (UTC)
- Configure retention (how many backups to keep)
Automated backups are stored in the /data/backups/ directory with filenames in the format:
{nodeId}-{timestamp}.yamlExample: 43588558-2025-10-28-12-34-18.yaml
Manual Backups
To create an on-demand backup:
- Navigate to the Configuration tab
- Click the Backup button in the top-right corner
- Choose whether to save to disk or just download
- The backup file will be downloaded to your computer
Backup File Format
Backups are saved in YAML format and are fully compatible with the official Meshtastic CLI. The format matches the output of:
meshtastic --export-config output.yamlThis means you can use MeshMonitor backups interchangeably with backups created by the official Meshtastic tools.
Example backup structure:
# start of Meshtastic configure yaml
channel_url: https://meshtastic.org/e/#ChASAQE...
config:
  bluetooth:
    enabled: false
    fixedPin: 123456
  device:
    nodeInfoBroadcastSecs: 10800
    role: CLIENT_MUTE
    tzdef: EST5EDT,M3.2.0/2:00:00,M11.1.0/2:00:00
  lora:
    modemPreset: MEDIUM_FAST
    region: US
    hopLimit: 5
  position:
    fixedPosition: true
    positionBroadcastSecs: 1800
location:
  lat: 26.333431
  lon: -80.267695
  alt: 5.0
module_config:
  mqtt:
    enabled: true
    address: mqtt.example.com
owner: My Node Name
owner_short: MNNRestoring Configuration with Meshtastic CLI
You can restore a MeshMonitor backup to any Meshtastic device using the official Meshtastic CLI tools.
Prerequisites
Install the Meshtastic Python CLI:
bashpip install meshtasticConnect your device:
- USB/Serial: Connect device via USB cable
- Network: Ensure device is on same network
- Bluetooth: Enable Bluetooth on your computer
Restore Process
Using USB/Serial Connection:
meshtastic --configure backup.yamlThe CLI will automatically detect your connected device and apply the configuration.
Using Network Connection:
meshtastic --host 192.168.1.100 --configure backup.yamlReplace 192.168.1.100 with your device's IP address.
Using Bluetooth:
meshtastic --ble "Device Name" --configure backup.yamlWhat Happens During Restore
When you restore a configuration:
- Device receives configuration: All settings are sent to the device
- Channels are configured: The channel URL is decoded and all channels are set up with encryption keys
- Device reboots: The device automatically reboots to apply changes
- Settings take effect: After reboot, device operates with restored configuration
Backup Encryption Keys
The backup includes your device's encryption keys and WiFi passwords. Store backup files securely and never share them publicly. Anyone with access to your backup file can decrypt messages from your mesh network and connect to your WiFi.
Restore Behavior
What Gets Overwritten
When restoring a backup, these settings are completely replaced:
- Device identity (names)
- LoRa radio settings
- All module configurations
- Channel settings and encryption keys
- WiFi and Bluetooth settings
What Doesn't Change
These items are not affected by restore:
- Device hardware model
- Firmware version
- MAC address
- Any locally stored messages or telemetry data
Partial Restore
You can manually edit the YAML backup file to restore only specific sections:
- Open the backup file in a text editor
- Delete the sections you don't want to restore
- Save the modified file
- Run the restore command
For example, to restore only LoRa settings, keep only the config.lora section.
Best Practices
Regular Backups
- Enable automated backups to protect against configuration loss
- Create manual backups before making significant configuration changes
- Keep backups after firmware updates in case you need to rollback
Backup Storage
- Store backups in multiple locations (local computer, cloud storage, USB drive)
- Keep backups from different time periods (don't immediately delete old backups)
- Consider encrypting backups if storing in cloud services
Before Restoring
- Verify the backup file is for the correct device or a compatible model
- Review the backup contents to ensure it has the settings you want
- Make a backup of the current configuration before restoring
- Ensure the device has adequate power (battery or connected to power)
After Restoring
- Wait for the device to fully reboot (30-60 seconds)
- Verify critical settings like region and channel configuration
- Test connectivity with other mesh nodes
- Check that module configurations are working as expected
Troubleshooting
Restore Fails or Hangs
- Ensure device is powered and responding
- Check USB cable connection quality
- Try using
--port /dev/ttyUSB0(Linux/Mac) or--port COM3(Windows) to specify port - Verify Python and meshtastic CLI are up to date:bash
pip install --upgrade meshtastic
Device Won't Reconnect After Restore
- Wait 60-90 seconds for full reboot cycle
- If using WiFi, the restored WiFi settings may be different
- Try connecting via USB/serial instead
- Check if region settings are compatible with your local regulations
Configuration Partially Applied
- Some settings may require multiple reboots to fully take effect
- Channels in particular may need an extra reboot
- Power cycle the device completely (disconnect power/battery) and reconnect
"Invalid Configuration" Error
- Verify the backup YAML file is not corrupted
- Check that the backup is from a compatible firmware version
- Ensure the backup file follows proper YAML formatting
- Try restoring individual sections instead of the complete file
Use Cases
Device Replacement
When replacing a failed device:
- Restore your backup to the new device
- The new device will have identical configuration
- Channels and encryption keys will match your network
- No manual reconfiguration needed
Multiple Identical Nodes
To deploy multiple nodes with the same configuration:
- Configure one node as a template
- Export its configuration
- Edit the backup to change node name/ID for each device
- Restore to each new device
Configuration Templates
Create backup templates for different use cases:
router-template.yaml- Settings for infrastructure nodesmobile-template.yaml- Settings for handheld devicessensor-template.yaml- Settings for sensor nodes
Testing and Development
- Backup production configuration
- Test experimental settings
- Restore original config if tests fail
- No need to manually track settings changes
Related Documentation
- Settings - Learn about MeshMonitor settings and backup automation
- Automation - Configure automation features
- Meshtastic Official Documentation
- Meshtastic CLI Documentation